从零开始的JSON库学习
从零开始的JSON库学习
本文章主要记录一下学习叶劲峰老师的开源
JSON库leptjsonmiloyip/json-tutorial: 从零开始的JSON库教程的过程及总结。本文中只给出部分代码示例,完整源代码请到lept_study查看。
一、JSON介绍、相关开发手段及理念
JSON(JavaScript Object Notation)是一个用于数据交换的文本格式,例如:
{
    "title": "Design Patterns",
    "subtitle": "Elements of Reusable Object-Oriented Software",
    "author": [
        "Erich Gamma",
        "Richard Helm",
        "Ralph Johnson",
        "John Vlissides"
    ],
    "year": 2009,
    "weight": 1.8,
    "hardcover": true,
    "publisher": {
        "Company": "Pearson Education",
        "Country": "India"
    },
    "website": null
}
可以看出,JSON是树状结构,而JSON只包含 6 种数据类型:
null: 表示为nullboolean: 表示为true或falsenumber: 一般的浮点数表示方式,在下一单元详细说明string: 表示为"..."array: 表示为[ ... ]object: 表示为{ ... }
要实现的json库,需求如下:
- 把
JSON文本解析为一个树状数据结构(parse)。 - 提供接口访问该数据结构(
access)。 - 把数据结构转换成
JSON文本(stringify)。

1.1 JSON 语法子集
下面是JSON语法子集,使用 RFC7159 中的 ABNF 表示:
JSON-text: ws value ws
    ws = *(%x20 / %x09 / %x0A / %x0D)
    value = null / false / true
        null  = "null"
        false = "false"
        true  = "true"
    value = number
        number = [ "-" ] int [ frac ] [ exp ]
        int = "0" / digit1-9 *digit
        frac = "." 1*digit
        exp = ("e" / "E") ["-" / "+"] 1*digit
    value = string
        string = quotation-mark *char quotation-mark
        char = unescaped /
            escape (
                %x22 /          ; "    quotation mark  U+0022
                %x5C /          ; \    reverse solidus U+005C
                %x2F /          ; /    solidus         U+002F
                %x62 /          ; b    backspace       U+0008
                %x66 /          ; f    form feed       U+000C
                %x6E /          ; n    line feed       U+000A
                %x72 /          ; r    carriage return U+000D
                %x74 /          ; t    tab             U+0009
                %x75 4HEXDIG )  ; uXXXX                U+XXXX
        escape = %x5C              ; \
        quotation-mark = %x22      ; "
        unescaped = %x20-21 / %x23-5B / %x5D-10FFFF
    value = array
        array = %x5B ws [ value *( ws %x2C ws value ) ] ws %x5D
        %x5B = [
        %x2C = ,
        %x5D = ]
    value = object
        object = %x7B ws [ member *( ws %x2C ws member ) ] ws %x7D
        member = string ws %x3A ws value
        %x7B = {
        %x3A = :
        %x7D = }
1.2 单元测试
测试驱动开发(Test-Driven Development,TDD)是一种软件开发方法论,它要求在编写代码之前先编写测试用例,然后编写代码以使这些测试用例能够通过。
测试驱动开发的实施过程:
- 为需要实现的新功能添加一批测试;
- 运行所有测试,看看新添加的测试是否失败;
- 编写实现软件新功能的实现代码;
- 再次运行所有的测试,看是否有测试失败;
- 重构代码;
- 重复以上步骤直到所有测试通过。
1.3 宏的编写技巧
反斜线代表该行未结束,会串接下一行。而如果宏里有多过一个语句(statement),就需要用do { /**...**/ } while(0)包裹成单个语句。
#define M()\
        do { a(); b(); }\
        while(0)

if (cond)
    M();
else
    c();

/* 预处理后 */

if (cond)
    do { a(); b(); } while(0);
else
    c();
1.4 断言(assertion)
C 语言的标准库含有assert()这个宏(需#include),提供断言功能。当程序以release配置编译时(定义了NDEBUG宏),assert()不会做检测;而当在debug配置时(没定义NDEBUG宏),则会在运行时检测assert(conditional)中的条件是否为真(非 0),断言失败会直接令程序崩溃。
另一个问题是,初学者可能会难于分辨何时使用断言,何时处理运行时错误(如返回错误值或在 C++ 中抛出异常)。简单的答案是,如果那个错误是由于程序员错误编码所造成的(例如传入不合法的参数),那么应用断言;如果那个错误是程序员无法避免,而是由运行时的环境所造成的,就要处理运行时错误(例如开启文件失败)。
1.5 union
另外,由于项目中使用了匿名union,此特性是C11版本之后新加入的,需要在CMakeLists.txt中指定C标准版本:
set(CMAKE_C_STANDARD 11)
1.6 内存泄露检测配置
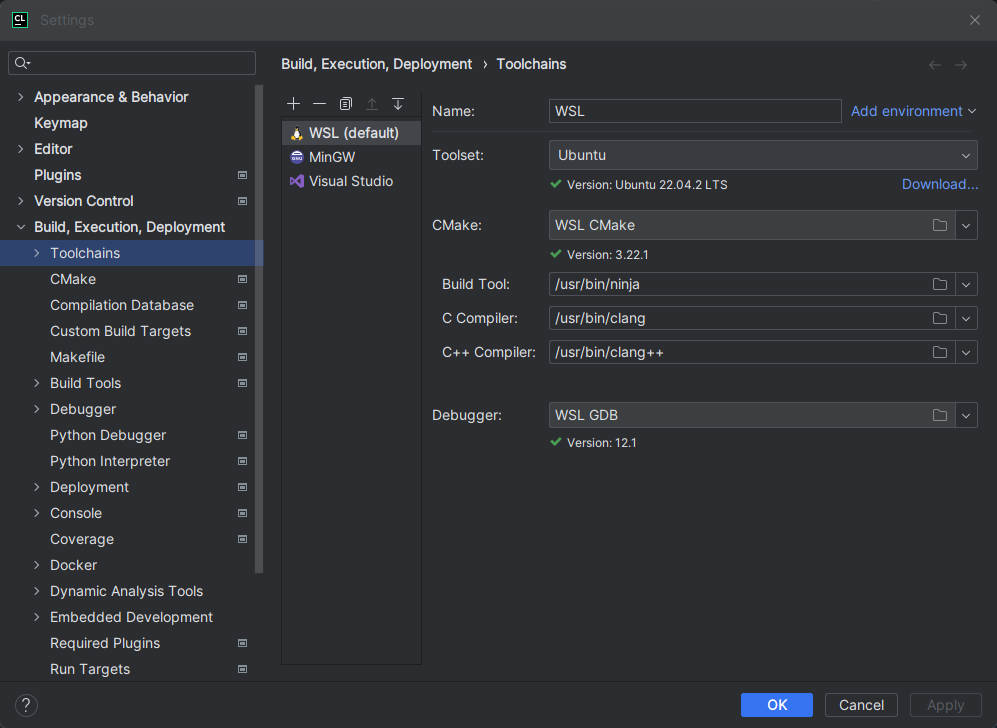
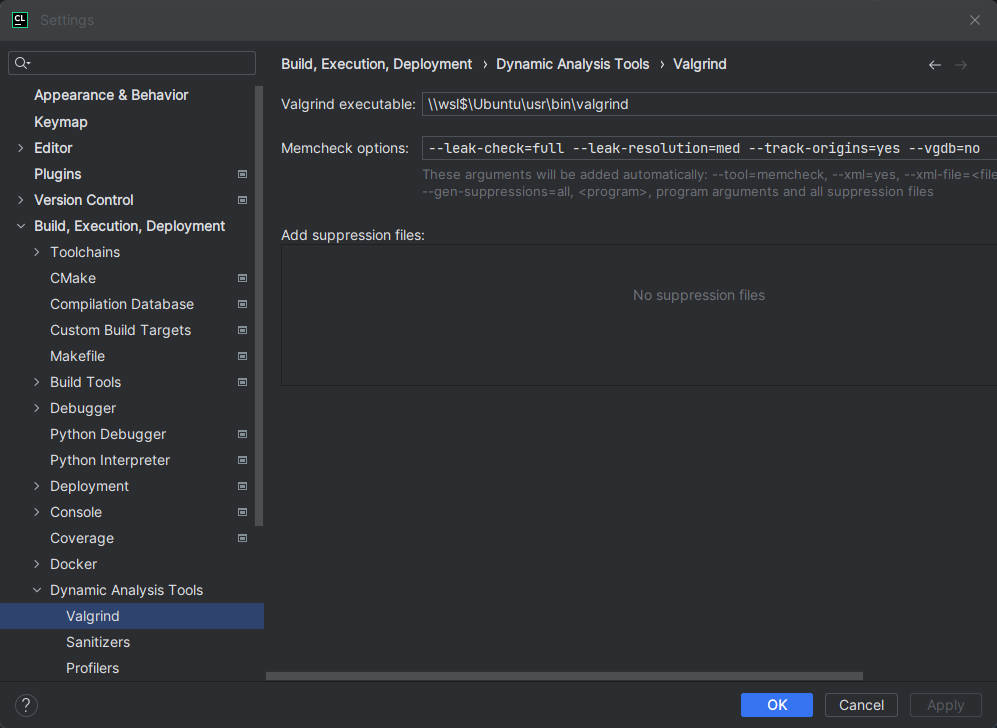
我们可以使用 valgrind (Linux / OS X)工具来检测内存泄漏问题,这里我选择的方案是在CLion配置编译环境为WSL2,配置如下:


另外由于使用的clang版本过新(我使用的是14.0.0)会导致使用Valgrind时报以下错误信息:
### unhandled dwarf2 abbrev form code 0x25
### unhandled dwarf2 abbrev form code 0x25
### unhandled dwarf2 abbrev form code 0x25
### unhandled dwarf2 abbrev form code 0x1b
改用gcc编译或者在CMakeLists.txt中加入以下编译选项后,重新加载CMakeLists.txt即可。
target_compile_options(leptjson PRIVATE -gdwarf-4)
target_compile_options(leptjson_test PRIVATE -gdwarf-4)
二、数据结构
在本次开发中共涉及两个主要步骤,一是解析传入的json文本为树形数据结构,二是生成相应的json文本,因此采用结构体类型存储过程值与结果值,同时定义相关的类型值与状态值(enum类型有利于更直观的表达相应的类型与状态):typedef enum { ··· } lept_type;、enum { LEPT_PARSE_OK = 0}。
存储解析得到的值用结构体lept_value表示(各数据类型都已作相关说明):
struct lept_value {
/* union: a variable that can be used to store different types of data at
different times Anonymous unions are a C11 extension. */
    union {
        /* string */ /* s: string */ /* len: string's length */
        struct { char* s; size_t len; }s;

        /* array */ /* e: element */ /* size: array's size */ /* capacity: array's capacity */
        /* array: dynamic array */
        /* The capacity is added here to better support operations on arrays, such as: add or delete elements */
        /* The capacity is the size of the array, and the size is the number of elements in the array. */
        struct { lept_value* e; size_t size, capacity; }a;

        /* object */ /* m: member */ /* size: object's size */ /* capacity: object's capacity */
        /* object: dynamic array */
        struct { lept_member* m; size_t size, capacity; }o;

        double n; /* number */
    };
    lept_type type; /* value type */
};

struct lept_member {
    char* k; size_t klen; /* member key string, key string's length */
    lept_value v; /* member value */
};
在解析和生成json文本的过程中,需要将输入输出数据存储到临时的缓冲区,以提高性能和简化实现。由于在解析过程中,这个缓冲区的大小是不能预知的。因此,我们可以采用动态数组(dynamic array)来实现:
typedef struct {
    const char* json;
    /* input output buffers (dynamic stack) */
    char* stack;
    size_t size, top;
} lept_context;
当中size是当前的堆栈容量,top是栈顶的位置(由于stack是可拓展的,所以不要用指针形式存储top)。
三、解析
3.1 主要解析步骤
对于解析部分,我们采用lept_parse()函数实现:
int lept_parse(lept_value* v, const char* json) {
    lept_context c;
    /* can be used to check the parse result */
    int ret;
    assert(v != NULL);
    /* initialize lept_context */
    c.json = json;
    c.stack = NULL;
    c.size = c.top = 0;
    /* initialize lept_value */
    lept_init(v);
    /* parse whitespace */
    lept_parse_whitespace(&c);
    /* parse the first character */
    if ((ret = lept_parse_value(&c, v)) == LEPT_PARSE_OK) {
        /* parse the next character */
        lept_parse_whitespace(&c);
        /* if the next character is not '\0', then the json string is not over */
        if (*c.json != '\0') {
            v->type = LEPT_NULL;
            ret = LEPT_PARSE_ROOT_NOT_SINGULAR;
        }
    }
    /* free the memory of lept_context */
    assert(c.top == 0);
    free(c.stack);
    return ret;
}
我们根据JSON语法格式JSON-text: ws value ws处理传入的json文本,注意对相应的变量(尤其是指针)做好初始化及释放工作。由上述函数可见,我们采用lept_parse_value()对缓冲区的数据进行解析,源代码如下:
static int lept_parse_value(lept_context* c, lept_value* v) {
    switch (*c->json) {
        case 'n':  return lept_parse_literal(c, v, "null", LEPT_NULL);
        case 'f':  return lept_parse_literal(c, v, "false", LEPT_FALSE);
        case 't':  return lept_parse_literal(c, v, "true", LEPT_TRUE);
        case '"':  return lept_parse_string(c, v);
        case '[':  return lept_parse_array(c, v);
        case '{':  return lept_parse_object(c, v);
        case '\0': return LEPT_PARSE_EXPECT_VALUE;
        default:   return lept_parse_number(c, v);
    }
}
3.2 相关函数拆解
我们选取其中解析字符串的函数lept_parse_string()进行介绍。
static int lept_parse_string(lept_context* c, lept_value* v) {
    int ret;
    char* s;
    size_t len;
    /* parse string */
    if ((ret = lept_parse_string_raw(c, &s, &len)) == LEPT_PARSE_OK) {
        lept_set_string(v, s, len);
    }
    return ret;
}
因为在后续对object类型解析的过程中,object的key属性为string类型,我们可以选择重构原来的字符串类型解析函数,提取出lept_parse_string_raw()函数,使得它既可以被字符串类型解析调用,又可以被object解析key时调用。
在解析字符串值时,最需要注意的便是对转义字符的处理,我们采用之前提到的缓冲区(采用dynamic array实现)来解决此问题。为了更好的实现对缓冲区的操作,我们实现堆栈的压入及弹出操作:
/* return the memory address of the top of the stack */
static void* lept_context_push(lept_context* c, size_t size) {
    /* check the stack size */
    assert(size > 0);
    void* ret;
    /* check the stack size */
    if (c->top + size >= c->size) {
        /* double the stack size */
        if (c->size == 0) {
            c->size = LEPT_PARSE_STACK_INIT_SIZE;
        }
        while (c->top + size >= c->size) {
            c->size += c->size >> 1;  /* c->size * 1.5 */
        }
        /* allocate memory */
        c->stack = (char*)realloc(c->stack, c->size);
    }
    /* returns the memory address of the top of the stack */
    ret = c->stack + c->top;
    /* update the top of the stack */
    c->top += size;
    return ret;
}

/* pop characters from the stack */
static void* lept_context_pop(lept_context* c, size_t size) {
    assert(c->top >= size);
    /* returns the memory address of the pop-up value and update the top of the stack */
    return c->stack + (c->top -= size);
}
实现以后为了简化代码,我们将压入单个字符与整块字符抽象为两个宏定义:
#define PUTC(c, ch) do { *(char*)lept_context_push(c, sizeof(char)) = (ch); } while(0)
#define PUTS(c, s, len) memcpy(lept_context_push(c, len), s, len)
接下来我们来看一下lept_parse_string_raw()的实现:
static int lept_parse_string_raw(lept_context* c, char** str, size_t* len) {
    /* ··· */
    for (;;) {
        /* ··· */
        case '\\':
            switch (*p++) {
                /* ··· */
                case 'u':
                    /* validate the 4 hexadecimal digits */
                    if (!(p = lept_parse_hex4(p, &u)))
                    STRING_ERROR(LEPT_PARSE_INVALID_UNICODE_HEX);
                    /* check the high surrogate */
                    if (u >= 0xD800 && u <= 0xDBFF) {
                        /* validate the low surrogate */
                        if (p[0] == '\\' && p[1] == 'u') {
                            /* skip '\u' */
                            p += 2;
                            if (!(p = lept_parse_hex4(p, &u2)))
                                STRING_ERROR(LEPT_PARSE_INVALID_UNICODE_HEX);
                            if (u2 < 0xDC00 || u2 > 0xDFFF)
                                STRING_ERROR(LEPT_PARSE_INVALID_UNICODE_SURROGATE);
                              /* calculate the code point */
                              /* codepoint = 0x10000 + (H − 0xD800) × 0x400 + (L − 0xDC00) */
                               u = (((u - 0xD800) << 10) | (u2 - 0xDC00)) + 0x10000;
                         	}
                           else
                              STRING_ERROR(LEPT_PARSE_INVALID_UNICODE_SURROGATE);
                    }
                    /* encode the code point as utf8 */
                    lept_encode_utf8(c,u);
                    break;
                    /* ··· */
            }
            break;
         case '\0':
            STRING_ERROR(LEPT_PARSE_MISS_QUOTATION_MARK);
        default:
            /* check the character */
            if ((unsigned char)ch < 0x20)
                STRING_ERROR(LEPT_PARSE_INVALID_STRING_CHAR);
               /* push the character to the stack */
            PUTC(c, ch);
    /* ··· */
}
其中最主要的即是关于转义字符及转义序列的处理,此处我们提取函数lept_parse_hex4()解析4位16进制数,对于基本多文种平面(basic multilingual plane, BMP)以外的字符,JSON会使用代理对(surrogate pair)表示 \uXXXX\uYYYY。在BMP中,保留了2048个代理码点。如果第一个码点是U+D800至U+DBFF,我们便知道它的代码对的高代理项(high surrogate),之后应该伴随一个 U+DC00 至 U+DFFF 的低代理项(low surrogate)。然后,我们用下列公式把代理对 (H, L) 变换成真实的码点:
codepoint = 0x10000 + (H − 0xD800) × 0x400 + (L − 0xDC00)
转换成C代码即:
u = (((u - 0xD800) << 10) | (u2 - 0xDC00)) + 0x10000;
对于处理后得到的码点,我们对它进行UTF-8编码。
| 码点范围 | 码点位数 | 字节1 | 字节2 | 字节3 | 字节4 |
|---|---|---|---|---|---|
| U+0000 ~ U+007F | 7 | 0xxxxxxx | |||
| U+0080 ~ U+07FF | 11 | 110xxxxx | 10xxxxxx | ||
| U+0800 ~ U+FFFF | 16 | 1110xxxx | 10xxxxxx | 10xxxxxx | |
| U+10000 ~ U+10FFFF | 21 | 11110xxx | 10xxxxxx | 10xxxxxx | 10xxxxxx |
函数实现也很简单,只需要做相应的位操作就行。
static void lept_encode_utf8(lept_context* c, unsigned u) {
    /* 1 byte */
    if (u <= 0x7F) {
        PUTC(c, u & 0xFF);
    }
    /* 2 bytes */
    else if (u <= 0x7FF) {
        PUTC(c, 0xC0 | ((u >> 6) & 0xFF));
        PUTC(c, 0x80 | ( u       & 0x3F));
    }
    /* 3 bytes */
    else if (u <= 0xFFFF) {
        PUTC(c, 0xE0 | ((u >> 12) & 0xFF));
        PUTC(c, 0x80 | ((u >>  6) & 0x3F));
        PUTC(c, 0x80 | ( u        & 0x3F));
    }
    /* 4 bytes */
    else {
        assert(u <= 0x10FFFF);
        PUTC(c, 0xF0 | ((u >> 18) & 0xFF));
        PUTC(c, 0x80 | ((u >> 12) & 0x3F));
        PUTC(c, 0x80 | ((u >>  6) & 0x3F));
        PUTC(c, 0x80 | ( u        & 0x3F));
    }
}
至此,有关于字符串的解析工作就已经全部完成。对于数组(array)和对象(object)的解析工作与字符串解析相差不大,需要注意的是在这两种数据类型的解析中我们会采用递归下降解析器(recursive descent parser)进行处理。在数组解析中我们采用leptvalue e创建一个临时变量来存储解析值,并在解析成功后将其压入栈中:
memcpy(lept_context_push(c, sizeof(lept_value)), &e, sizeof(lept_value));
在对象解析中同样如此,只不过我们采用单独的成员结构体lept_member m来存储解析过程中间解析到的键char* k与对应的值lept_value v。
值得注意的是在解析完成后我们需要释放临时变量e与m malloc的内存空间:
/* array */
/* pop and free the elements on the stack */
for (i = 0; i < size; i++)
    lept_free((lept_value*)lept_context_pop(c, sizeof(lept_value)));

/* ··· */

/* object */
/* free the key */
free(m.k);
/* pop and free the members on the stack */
for (i = 0; i < size; i++) {
    lept_member* mf = ((lept_member*)lept_context_pop(c, sizeof(lept_member)));
    free(mf->k);
    lept_free(&mf->v);
}
v->type = LEPT_NULL;
同样,在完成整个JSON解析过程后,我们需要对手动malloc的内存空间进行释放,我们实现一个lept_free()函数,同样是采用分类+递归的方法进行内存释放。
void lept_free(lept_value* v) {
    assert(v != NULL);
    size_t i;
    /* free the memory */
    switch (v->type) {
        case LEPT_STRING:
            free(v->s.s);
            break;
        case LEPT_ARRAY:
            /* free the memory of each element */
            for (i = 0; i < v->a.size; i++)
                lept_free(&v->a.e[i]);
            /* free the memory of the array */
            free(v->a.e);
            break;
        case LEPT_OBJECT:
            /* free the memory of each member */
            for (i = 0; i < v->o.size; i++) {
                free(v->o.m[i].k);
                lept_free(&v->o.m[i].v);
            }
            /* free the memory of the object */
            free(v->o.m);
            break;
        default: break;
    }
    v->type = LEPT_NULL;
}
整个解析流程的主要步骤就是以上这些。对于提供给外部访问的API函数,我们同样分别加以实现,此处对于简单的获取类型(或值),设置类型等函数不在详述,主要分析一下有关于赋值操作的三个函数lept_move()、lept_swap()、lept_copy()。对于移动赋值和交换赋值来讲,实现的步骤也很简单,直接看代码:
void lept_move(lept_value* dst, lept_value* src) {
    assert(src != NULL && dst != NULL && src != dst);
    /* free the memory of dst */
    lept_free(dst);
    /* move the memory of src to dst */
    memcpy(dst, src, sizeof(lept_value));
    /* reset the type of src to null */
    lept_init(src);
}

void lept_swap(lept_value* lhs, lept_value* rhs) {
    assert(lhs != NULL && rhs != NULL);
    /* swap the memory of lhs and rhs by using a temporary variable */
    if (lhs != rhs) {
        lept_value temp;
        memcpy(&temp, lhs, sizeof(lept_value));
        memcpy(lhs,   rhs, sizeof(lept_value));
        memcpy(rhs, &temp, sizeof(lept_value));
    }
}
而对于拷贝赋值操作来说,我们需要考虑其他因素,因此,我们采用与lept_free()相同操作(分类+递归)进行实现:
void lept_copy(lept_value* dst, const lept_value* src) {
    size_t i;
    assert(src != NULL && dst != NULL && src != dst);
    /* copy to dst according to different types */
    switch (src->type) {
        case LEPT_STRING:
            lept_set_string(dst, src->s.s, src->s.len);
            break;
        case LEPT_ARRAY:
            /* initialize dst as an array */
            dst->type = LEPT_ARRAY;
            dst->a.e = (lept_value*)malloc(sizeof(lept_value) * src->a.size);
            lept_reserve_array(dst, src->a.size);
            /* copy the elements by recursive call */
            for (i = 0; i < src->a.size; i++)
                lept_copy(&dst->a.e[i], &src->a.e[i]);
            dst->a.size = src->a.size;
            break;
        case LEPT_OBJECT:
            /* initialize dst as an object */
            dst->type = LEPT_OBJECT;
            dst->o.m = (lept_member*)malloc(sizeof(lept_member) * src->o.size);
            lept_reserve_object(dst, src->o.size);
            /* copy the members */
            for (i = 0; i < src->o.size; i++) {
                /* copy the key */
                lept_set_string(&dst->o.m[i].k, src->o.m[i].k, src->o.m[i].klen);
                /* copy the value */
                lept_copy(&dst->o.m[i].v, &src->o.m[i].v);
            }
            /* update the size of dst */
            dst->o.size = src->o.size;
            break;
        default:
            /* free the memory of dst */
            lept_free(dst);
            /* copy the value directly */
            memcpy(dst, src, sizeof(lept_value));
    }
}
对于其中涉及到的lept_reserve_object()与lept_reserve_array()函数,是为了方便增删元素而引进了容量capacity的概念,这两个函数即是对capacity进行扩增的操作。
四、生成
在完成解析任务后,我们还需要对解析到的值转换为JSON文本的功能,与解析过程类似,采用lept_stringify()与lept_stringify_value()函数实现,将待转换的值存入缓冲区中,全部完成转换后返回缓冲区c.stack的内存地址。
char* lept_stringify(const lept_value* v, size_t* length) {
    lept_context c;
    assert(v != NULL);
    /* initialize lept_context */
    c.stack = (char*)malloc(c.size = LEPT_PARSE_STRINGIFY_INIT_SIZE);
    c.top = 0;
    /* stringify the value */
    lept_stringify_value(&c, v);
    if (length)
        *length = c.top;
    /* add '\0' to the end of the string */
    PUTC(&c, '\0');
    return c.stack;
}
生成器现已支持换行与缩进功能,详细信息请查看源码lept_stringify_value()函数。
五、测试
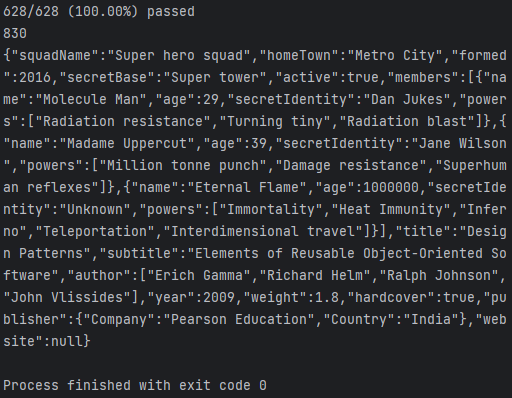
跑通所有单元测试并解析json文件与文本生成,结果如下:

六、总结与收获
在本次项目的开发中,学习到了许多,如:各种变量类型的合理使用(enum、union···),API函数的设计,TDD开发,static关键字的使用,宏的使用与编写技巧,断言(assert)的使用,内存管理 ··· 。
其中内存管理应该是最重要的知识点,从叶劲峰老师的动态数组建立缓冲区的操作中学到许多,及手动实现三种赋值操作,对于变量的内存概念进一步加深,以及对于内存释放lept_free()的实现。
本次项目虽然只是一个简单的JSON库的实现,却也包含了许多项目开发中需要注意到的细节,建议初学者学习。
本篇文章到这里就结束了,如果你对本项目有兴趣,欢迎在评论区进行讨论!
祝你好运^_^
